June 28, 2012

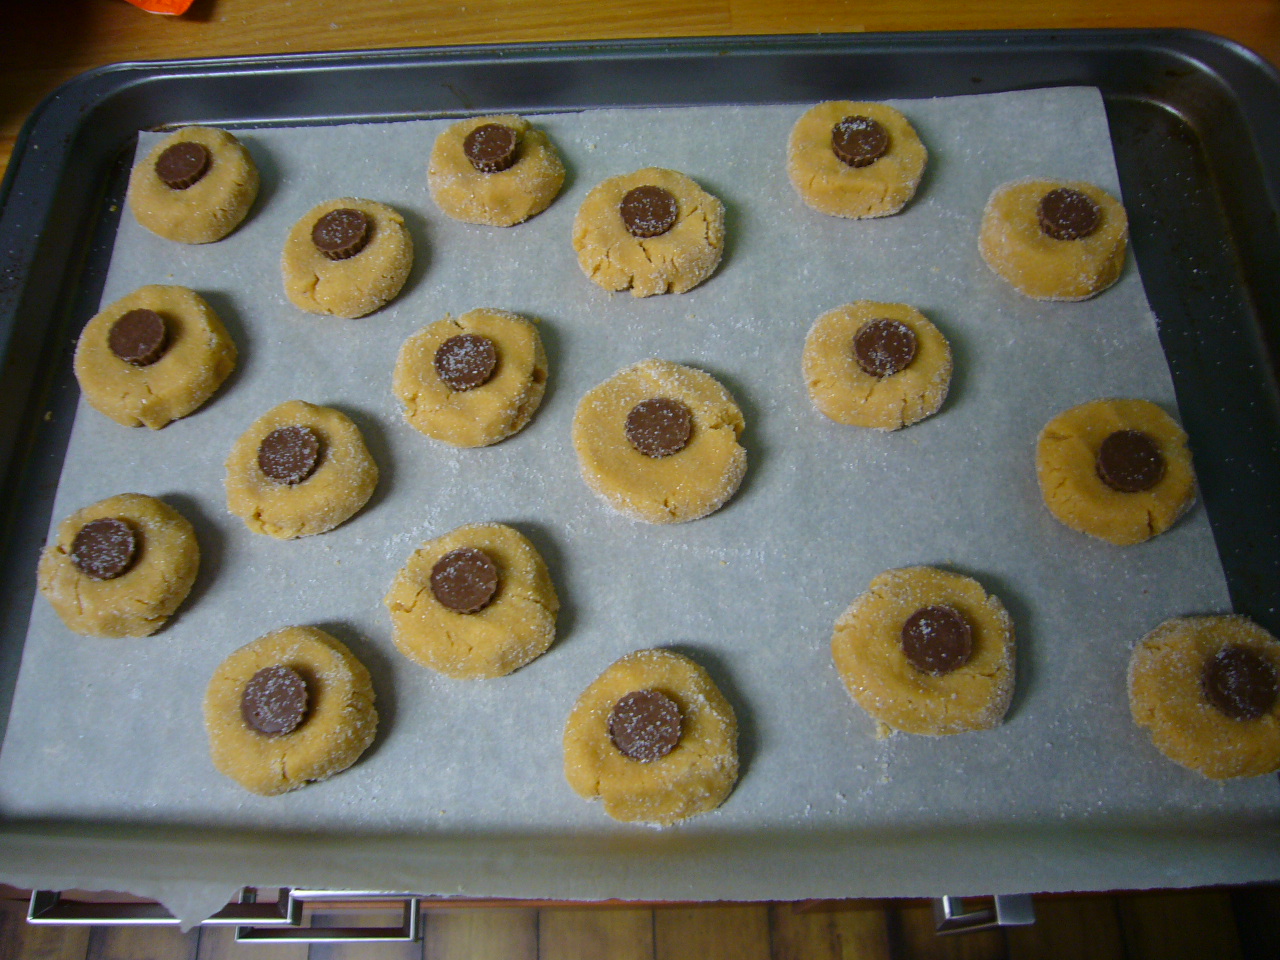
Peanut Butter Cup Cookies


This is a kicked up version of my original peanut butter cookies. This is one of my favourite peanut butter cookie recipes because they are crunchy on the outside and super chewy on the inside. On our recent trip back to the coast, we ate some delish mini Reese cups and I thought they would taste really good in a cookie! So here they are...


Ingredients:

  • 1/2 cup Butter
  • 1/2 cup Brown Sugar
  • 1/2 cup White Sugar (+ more for rolling)
  • 1 Egg
  • 1 cup Smooth Peanut Butter
  • 1/2 tsp Vanilla
  • 1/2 tsp Salt
  • 1/2 tsp Baking Soda
  • 1 1/2 cups Flour
  • Reese minis

Steps:

  1. Preheat oven to 375F. In a large bowl, cream together butter and sugars.
  2. Beat in egg, vanilla, and peanut butter.
    3.  In a small bowl, combine flour, salt, and baking soda. 
    4.  Roll tablespoon sized balls in sugar. Place on baking sheet and press down slightly to flatten. Push in a Reese mini.


    5. Bake for 10-15 minutes or until slightly golden on the bottom. Let cookies cool on the pan for about 2  minutes before moving to a cooling rack. 

My cookies turned out a bit flatter than they normally do. I think i pushed them down a bit too much.Either way they still taste amazing!! Hope you enjoy!

May 05, 2012

Mason Spice Jars

[ Mason Spice Jars ]

       Well it has certainly been a while since I have posted anything... on this blog that is! It has been a very busy past year finishing my PDP. While I was doing that, I was updating my other blog and putting my creative efforts into teaching. Now it is back to regular life as a TOC so my weekends can be spent creating things for my new home! Here is my first project and hopefully a kick start to more regular posts.

        Now that I have a wonderful new kitchen (with an island might I add...), I want to keep it organized and accessible. I have always hated having a cupboard filled with random spice jars so instead I have decided to use mason jars to organize my spices. I love that I can clearly see what is inside each jar and that they all stack so neatly in the cupboard. 

[ My New Toy ]
       I finally got a label maker (YAY!) so I made some labels for my jars. I decided to use the clear labels, but white would look nice too. I labelled both the side and the top of the jar


       I love how neat the cupboard looks now and how easily I can see what is in each jar. This makes me want to do some cooking and baking which hopefully means some more recipes posted here soon!


October 11, 2010

Motorcycle Cake


Okay, so this is so looonnngggg overdue!! In August I made this cool motorcycle cake for my boyfriend's 22nd birthday. He just got a motorcycle so I thought this theme would fit the bill. Let's start with the cake. It was a two layer vanilla cake with banana custard in the middle. I then iced it with Wilton's #233 tip. It makes awesome looking grass. To make the grass look more realistic, I put a light and dark green icing the in the bag and piped it out at the same time. This gives the grass more dimension. I also was able to find some chocolate rocks to line the road and the bottom. They looked so realistic you couldn't even tell that they were food. The road itself (which I wish I had a better picture of) was made from thick flat strips of black licorice.


The chocolate motorcycle is probably my favourite part of this cake. I found the perfect moulds and chrome lustre dust. When mixed with vodka or gin, the dust is perfect for painting onto chocolate and gave the motorcycle a very unique look. To make the bike stand up I sandwiched a Popsicle stick between two finished bikes and stuck it into the cake. Altogether the cake turned out great and my boyfriend loved it!

June 24, 2010

My New Favourite Thing: Powdered Food Colouring


While trying to find a way to add some interest to a coconut cupcake, I came across this wonderful product: food colouring powder. For those who do a lot of baking this is probably not a new thing to you. I am using the Candy-n-Cake brand and it cost about $2 for 3 grams (you don't use a lot). I have used a similar product before, but it was flavoured too and I didn't really want to add apple flavour to a coconut cupcake. The great thing about this product is that it has no flavour at all. Sometimes when using the gel colourings you get a bitter taste (especially with the red). I have yet to try it with icing, but will be sure to post an update when I do.

To colour coconut, put coconut into a Ziploc bag and add a bit of the powdered food colouring (remember: A little goes a long way!). Shake it up and add more colouring if needed. This would look great to add the look of fur or grass to cakes and cupcakes. Imagine the possibilities!

June 17, 2010

Chai Sugar Cookies

If you like chai tea you will love these! This is an adaptation of my grandma's sugar cookies. They are crisp on the outside and soft on the inside. I have included a half recipe because it makes so many, but it could easily be doubled.

Ingredients:
  • 2 1/2 cups Flour
  • 1 cup White Sugar
  • 1/4 tsp Salt
  • 2 tsp Baking Powder
  • 1/2 cup Butter
  • 2 Eggs
  • 1 tsp Vanilla
  • 1 Tbsp Milk
  • 4 Tbsp Chai Powder (The kind that you mix with milk. It can be found at coffee shops and specialty stores.)
  • Extra chai powder and sugar for tops of cookies.
Steps:
  1. In mixer, cream together butter and sugar. The longer you cream these together the smoother your dough will be.
  2. In a bowl, combine flour, salt, baking power, and chai powder. Set aside.
  3. To butter mixture, add eggs, vanilla, and milk and beat until mixed.
  4. Gradually add flour mixture. You may need to use your hands to make sure all the flour is combined.
  5. Separate into two, wrap with plastic wrap and refrigerate for 2 hours or overnight.
  6. Once refrigerated, preheat oven to 350° and line cookie sheets with a silicone mat if using.
  7. Roll out dough about 1/4 inch thick. Cut into shapes and sprinkle tops with extra granulated sugar and chai powder.
  8. Bake for 10 mins or until golden brown. (TIP: cookies will hold their shape better if the dough is cold. So before baking, you can return the sheets to the fridge for about 10 mins. Make sure to keep dough you are not using refrigerated until it is ready to go into the oven.)
  9. Let cool on pan for a few minutes then transfer to a cooling rack. These cookies taste better when they have completely cooled.
The great thing about these is that you can freeze dough for later if you have extra and keep it on hand. Enjoy and happy baking!

May 16, 2010

Stacked Pot Planter


I saw this project on instructables.com and I knew I just had to make one for strawberries. It is really simple to construct. I used an X made from wood instead of the PVC pipe that the original used and painted my pots bright pink. It looks super cute and I can't wait until I get some nice red berries. I would recommend painting the rod that goes up the middle so that it is a little less visible. The rod in the middle should also be pretty thick to minimize swaying.

After making the tower for strawberries, I went straight to making one for herbs using smaller pots. These are super functional for anyone with limited space and they add a lot of interest to any garden!


Happy Gardening!

April 26, 2010

Homemade Tea Bag


I have some loose teas that I love and wanted a way to have them on the go. So instead of toting a tea ball around, I thought I would make my own tea bags. Throw some into a Ziploc and into your bag and you've got loose tea on the go!

Materials:
  • Cheese Cloth
  • Kitchen Twine
  • Sewing Needle
  • Optional: sticker paper for tea tags


{Step 1}.........................{Step 2}

Step 1: Cut out a 4-layer square of cheese cloth and place 1 tsp. of loose tea leaves in the middle.
Step 2: Using kitchen twine (separated in 1/2 so its easier to thread onto the needle) and a
needle, thread twine through side closest to you, then the side farthest away.
Step 3: Thread twine through right side, then through left side. It should look something like
this:


{after step 3}

Step 4: Now thread through the corners the same way going across from each corner until all 4 corners have been threaded. The bag will now look like this:


Step 5: Tie around the top and knot to secure. The top can then be trimmed.
Step 6: Trim remaining string. Attach a tag if desired. I made my tags on MS Word and printed
them off onto sticker paper. I then stuck two together to create a double sided tea tag.


{Finished Tea Bag}

I find this way to be most secure, but if it seems too complicated you can use the following alternate method.


Alternate Method: Thread in and out in a circle around the 4-layer square of cheese cloth. Put 1 tsp. of loose tea leaves into middle. Pull the two ends of the string together and knot. Continue with step 5 above and you're done!

April 22, 2010

We Go Together...Like PB & J [Cookies!]


While my boyfriend was off at school, I sent him his favourite: peanut butter cookies! This recipe was my Grandma's and is sooo yummy! The outside has a bit of crunch because of the sugar, while the inside is soft and chewy.

Ingredients:
  • 1/2 cup Butter
  • 1/2 cup Brown Sugar
  • 1/2 cup White Sugar
  • 1 Egg
  • 1 cup Peanut Butter
  • 1/2 tsp Vanilla
  • 1/2 tsp Salt
  • 1/2 tsp Baking Soda
  • 1 1/2 cups Flour
  • 1 cup Chocolate Chips (optional)
Steps:
  1. Preheat oven to 375 F.
  2. In a large bowl, cream butter and sugars. Beat in egg, vanilla, and peanut butter.
  3. In another smaller bowl, combine salt, baking soda, and flour. Gradually add to butter mixture.
  4. If using, add chocolate chips and mix well.
  5. Roll dough into 1 inch balls then roll in white sugar (or decorative sugar) and press with a fork.
  6. Bake for 10-12 mins or until lightly brown. Cool and enjoy!


You can also make a PB & J card if you are sending these to someone special. These cookies mail well too. I wrapped them in an old paper towel tube and foil and they were still moist after 3 days in the mail. Happy baking!

March 09, 2010

Envelope Bill & Receipt Organizer

After seeing various other blogs using envelopes to create organizers, I thought I would come up with my own version.

Materials:
  • envelopes (one for each category you want to make)
  • patterned paper
  • ribbon
  • glue
1. Cut off the top flap of the envelope then trace the envelope on the back of your choice of patterned paper. Glue the paper onto the front of the envelope.


2. Create labels for each envelope. I will now introduce you to my favorite tool ever: the sticker maker! You can make anything into a sticker. Put it into the machine, pull the tab at the bottom and it automatically puts adhesive on the back of your object. Mess free and so much fun!


3. Measure ribbon for the length that you want your organizer to be. Then punch holes in each envelope (I put mine at 1cm and 9cm from the top) on each side. Make sure they are equal on each side so it won't turn out lopsided. Use a glue dot to help secure your ribbon while you attatch the ribbon to the envelope with a brad

.


4. Make a loop with ribbon and attatch it using a brad to the centre of the top envelope. Now hang it up and fill it with recipes, coupons, bills, and any other bits you want!


~


Check out this site for their envelope organizer under "SC Johnson’s Right@Home Blog Posts." This was my inspiration...

January 13, 2010

Faux Polaroid Photo Wall


This is a cool way to display photos. Now that Polaroids are no longer available, you can turn any of your regular photos into a 'Polaroid'. Download the program here. I printed mine onto photo paper and cropped the total size to 3.5 inches x 4.25 inches (the dimensions of a real Polaroid) and put them on a bulletin board. I love this program because it crops the photos and gives them that 'Polaroid' look by altering the colour and putting a border around them. Very fun! You can also write a message or memory below in the white space. Have fun with this it's addicting!!

January 07, 2010

Simple Crochet Toque


This is a simple crochet pattern for a toque that you can make. If you know how to do a double crochet then you can make this. It is very simple and once you get the hang of doing a double crochet you can whip them off in no time. For Christmas I made about 6 of them! If you are quick it can be done in less than 5 hours. The black and white striped toque is make with separate rows while the multicoloured one is a continual spiral. This pattern can be easily adjusted to make it bigger or smaller and can be make with or without the ear flaps (which I have done and will still cover the ears if you choose not to use ear flaps).

I used a size K hook and a bulky (~6)weight yarn.

Rnd 1: Ch. 3. Sl st in first ch to form a ring. Ch 3 (counts as dc), dc 11 in ring (should have total of 12 dc). If you are doing a continual spiral (if using just one colour of yarn) then make sure you use a stitch marker and continue on. Otherwise fasten off and start with next colour.

Rnd 2: 2 dc in each dc of previous rnd.

Rnd 3: [2 dc, then 1 dc in next], repeat around.

Rnd 4: [2 dc, then 1 dc in next 2], repeat around.

Rnd 5: [2 dc, then 1 dc in next 4], repeat around.

Rnd 6-14: 1 dc in each st around. (The amount of rows can be adjusted depending on the length you want. 11 rows is sufficient if you are using a super bulky weight).

Rnd 15: sc in each st around to finish off.

Optional: Add ear flaps starting about 6-8 st from back seam. Do rows of dc to fit width of ear flap and decrease as you go down. The number of stitches will depend on the type of wool you use but it should be somewhere between 10-15 dc wide and about 6 rows long. Braid 12 pieces of wool for tails.

I made the multicoloured hat and scarf for my brother for Christmas and you could make a matching scarf easily by doing straight rows of dc. Start with a chain of your desired length then dc along the original chain until you have your desired width.

How to double crochet

Any questions? Just ask and I'll try to help!

December 21, 2009

Sponge Toffee


Here is a different candy idea that is fun and easy to make and tastes great! It is like the inside of a Crunchie bar. The pieces could also be dipped in chocolate which would taste really good. There are lots of recipes on the web for this candy. Some include vinegar and others don't. I got my recipes here which doesn't use vinegar. Make sure you line your pan when making this with parchment otherwise you will have a difficult time removing it when it's done. Have fun!

December 17, 2009

Peppermint Bark


Nothing says the holidays like peppermint bark! All you need is white chocolate and candy canes. Unwrap and put candy canes into a Ziploc bag. Now take out all those mall-shopping frustrations and hit them with a wooden mallet, heavy pan, or a hammer until they are in small pieces. Try not to turn them into powder. Over a double boiler, melt white chocolate (the amount is up to you, it all depends on how much you want). Mix in peppermint pieces. I also add peppermint flavouring for a bit of extra flavour. Put a piece of parchment paper or a Silpat over a cookie sheet and pour chocolate onto it. Spread out using a spatula. You can top your bark with more peppermint pieces or use green melting chocolate and drizzle that on top. Put it in the freezer until it hardens (~15 minutes) then break into chunks. This is a simple recipe and can be adapted depending on the amount you want to make. This is a fun recipe to do with kids too because they can have fun breaking up the peppermints. Happy Holidays!

Mint Patties


This is a yummy peppermint recipe for the holidays. It comes from my Auntie Rita who makes them every year and I just had to have it because they are so good! You could probably cover them in chocolate too and it would taste really good or even try out some different flavours. These are really easy to make and just as easy to eat!

Ingredients:
  • 2 1/2 cups icing sugar
  • 3 Tbsp butter
  • 2 Tbsp cream (or milk)
  • 1-2 tsp peppermint extract to taste (I used a few drops of candy flavouring in mine)
  • Red and Green food colouring
  1. Mix all ingredients except food colouring until smooth and creamy. (Using your hands here works well)
  2. Divide mixture in half and colour.
  3. Roll into small balls and place on waxed paper. Flatten slightly with a fork. They should be about the size of a quarter.
  4. Let dry for several hours. Store in an air tight container.
This makes about 50 patties. Enjoy!

October 03, 2009

Witches Fingers

Halloween just wouldn't be Halloween without edible oddities! And what is more spooky than eating creepy green witch fingers? Jagged sliced almonds for nails and red decorators gel for gooey nails makes these fingers extra appetizing. It is a simple and delicious recipe!

  • 175mL Butter
  • 160mL Sugar
  • 2 Eggs
  • 30mL Milk
  • 5mL Almond Extract
  • 625mL Flour
  • 5mL Baking Powder
  • 2mL Salt
  • Green Food colouring (the gel kind gives a brighter colour)
  • Almond slices
  • Red decorating Gel
Dough:
  1. Cream together butter and sugar in large mixing bowl.
  2. Add eggs, milk, almond extract, and food colouring. Beat well until combined.
  3. In a medium bowl, sift together flour, baking powder, and salt.
  4. Gradually add flour mixture into creamed mixture. Mix until well blended. (Note: The dough will be a bit sticky)
  5. Divide dough into two balls, wrap, and chill for 2 hours or overnight.
Baking:
  1. Preheat oven to 350°F.
  2. Roll about a tablespoon (15mL) of dough to form a 'finger'
  3. Give finger two squeezes to form knuckles.
  4. Using a knife, make small cuts into knuckles to make wrinkles.
  5. Place sliced almonds on top of the end to form nails.
  6. Bake 10-12 minutes or until lightly browned.
  7. Remove from cookie sheet and cool for 2-3 minutes. Remove almond nail and squeeze small amount of red decorator gel then replace almond.

[ squeeze to form knuckles, cut in wrinkles, and place almond as the nail]

A great way to serve these cookies is in a martini glass or bowl where the fingers can stick up out of. Enjoy!


*I made these in highschool in my cooking class so I don't have a source to cite them*